$ git clone git@github.com:infinispan/infinispan.git
AuthorsGalder Zamarreño , Kévin Pollet , Pete Muir , Sanne GRINOVERO , Tristan Tarrant
Target Audience
This guide shows you how to contribute to the Infinispan project. It contains useful information for anyone from a casual contributors, wishing to submit a bug report, to full time developers.
Infinispan's Architecture
Interested in reading more about Infinispan's architecture? Check out the Architectural Overview.
The Basics
In this chapter we quickly walk through the basics on contributing; future chapters go into more depth.
requisites
|
Java 1.6 |
Infinispan is baselined on Java 6.0, and is built and tested using Sun Java 6.0. |
|
Maven 3 |
The Infinispan build uses Maven, and we recommend using Maven 3. |
|
Git (optional) |
The Infinispan sources are stored in Git. If you don't wish to install Git, you can download source bundles |
Issue Management - JIRA
Infinispan uses JIRA for issue management, hosted on issues.jboss.org. You can log in using your normal jboss.org username and password.
If you need to create a new issue then follow these steps.
-
Choose between
-
Feature Request if you want to request an enhancement or new feature for Infinispan
-
Bug if you have discovered an issue
-
Task if you wish to request a documentation, sample or process (e.g. build system) enhancement or issue
-
-
Then enter a Summary, describing briefly the problem - please try to be descriptive!
-
You should not set Priority.
-
Now, enter the version you are reporting an issue against in the Affects Version field, and leave the Fix Version field blank.
-
In the Environment text area, describe in as much detail as possible your environment (e.g. Java runtime and version, operating system, any network topology which is relevant).
-
In the Description field enter a detailed description of your problem or request.
-
If the issue has been discussed on the forums or the mailing list, enter a reference in the Forum Reference field
-
Finally, hit Create
Versioning Guidelines
Only Infinispan contributors should set the Fix Version field.
When setting the Fix Version field for bugs and issues in JIRA, the following guidelines apply:
Version numbers are defined as MAJOR.MINOR.MICRO.MODIFIER. For example, 4.1.0.BETA1 would be:
|
MAJOR |
4 |
|
MINOR |
1 |
|
MICRO |
0 |
|
MODIFIER |
BETA1 |
If the issue relates to a Task or Feature Request, please ensure that the .FINAL version is included in the Fixed In field. For example, a new feature should contain 4.1.0.BETA1, 4.1.0.FINAL if it is new for 4.1.0 and was first made public in BETA1. For example, see ISPN-299.
If the issue relates to a bug which affected a previous FINAL version, then the Fixed In field should also contain the .FINAL version which contains the fix, in addition to any ALPHA, BETA or CR release. For example, see ISPN-546.
If the issue pertains to a bug in the current release, then the .FINAL version should not be in the Fixed In field. For example, a bug found in 4.1.0.ALPHA2 (but not in 4.1.0.ALPHA1) should be marked as fixed in 4.1.0.ALPHA3, but not in 4.1.0.FINAL. For example, see ISPN-416.
Source control - Git
Infinispan uses git, hosted on GitHub, for version control. You can find the upstream git repository at https://github.com/infinispan. To clone the repository:
or to clone your fork:
$ git clone git@github.com:YOUR_GITHB_USERNAME/infinispan.git
For more information, read the Git chapter.
Setting up your IDE
Maven supports generating IDE configuration files for easy setup of a project. Tested are Eclipse, IntelliJ IDEA and Netbeans.
Before we import the project, we need to clone the project as described above.
Eclipse
-
Install the m2eclipse plugin if you have not already installed it. Eclipse is including it since version "Indigo" 3.7, for older versions follow instructions at http://eclipse.org/m2e/.
-
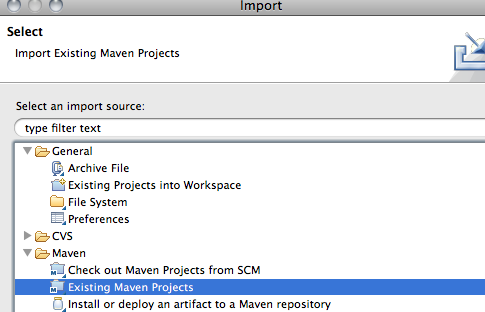
Import the Infinispan maven project. Select File -> Import in your eclipse workbench. Select the Existing Maven Project importer.
-
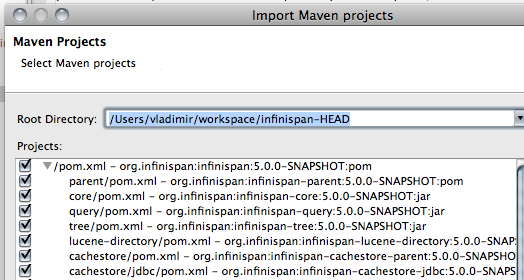
Select the root directory of your Infinispan checkout.
-
Select Infinispan modules that you want to import.
-
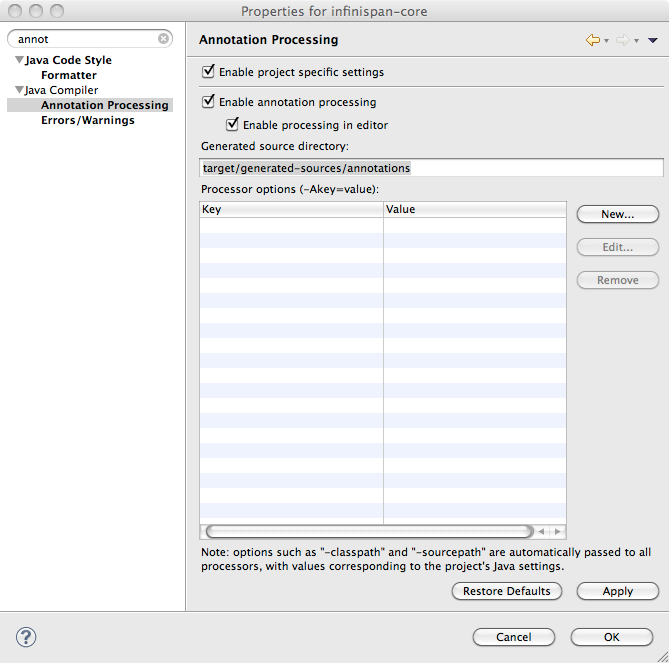
Finally, from Infinispan 5.0 onwards, annotation processing is used to allow log messages to be internationalized. This processing can be done directly from Eclipse as part of compilation but it requires some set up:
-
Open the properties for infinispan-core and locate Annotation Processing
-
Tick Enable project specific settings
-
Enter target/generated-sources/annotations as the Generated source directory
-
Code Formatting. From the menu Window->Preferences-> select Java -> Code Style -> Formatter. Import formatter.xml
Code template. From the menu Window->Preferences-> select Java -> Code Style -> Code Templates. Import codetemplates.xml
As some modules use Scala, it's worth installing the Scala tools.
IntelliJ IDEA
IntelliJ's built-in Maven support is the best way to go. From IntelliJ 9 onwards, this is a robust and reliable mechanism to import a project from Maven.
-
Create a new project in IntelliJ

-
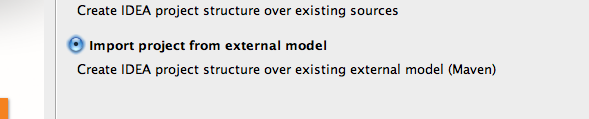
And choose to import the project from an external model
-
When asked, point the wizard to the directory created when you cloned the repository
-
Make sure that the check-boxes for "Search for projects recursively" and "Create module groups for multi-module Maven projects" are checked.
-
Just follow through the rest of the steps in the wizard and you're good to go.
-
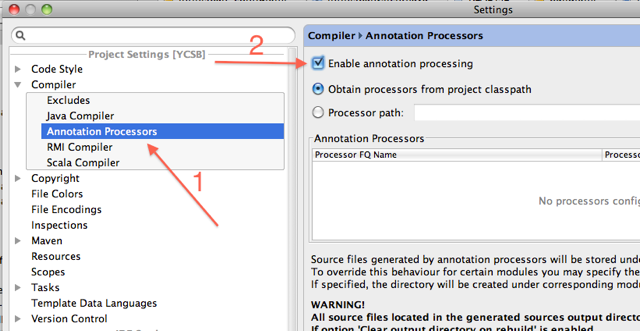
Finally, from Infinispan 5.0 onwards, annotation processing is used to allow log messages to be internationalized. This processing can be done directly from IntelliJ as part of compilation but it requires some set up:
-
Go to "Preferences/Compiler/Annotation Processor" and click on Enable annotation processing
-
Add an annotation processor with "Processor FQN Name" as org.jboss.logging.LoggingToolsProcessor
-
In "Processed Modules", add all modules except the root and the parent modules.
IntelliJ has built in Scala support, just make sure the Scala module is installed.
IntelliJ related code style jar is at idea-code-style.jar
Build - Maven
Infinispan uses Maven for builds. Make sure you have Maven 3 installed, and properly configured. For more information, read the Maven chapter.
Continuous Integration - Jenkins on Cloudbees
Infinispan uses Jenkins on Cloudbees for continuous integration. Jenkins polls GitHub for updates and runs whenever updates are available. For more information view the project site.
Testing - TestNG
Infinispan uses TestNG for unit and functional tests, and all Infinispan tests are run in parallel. For more information see the Test Suite chapter; this chapter gives advice on writing tests which can safely execute in parallel.
Communicating with other Infinispan contributors
Infinispan contributors use a mix of mailings lists and IRC to communicate ideas and designs, with more detailed designs often making their way into wiki pages.
Style Requirements
Infinispan uses the K&R code style for all Java source files, with two exceptions:
-
use 3 spaces instead of a tab character for indentations.
-
braces start on the same line for class, interface and method declarations as well as code blocks.
In addition, sure all new line characters used must be LF (UNIX style line feeds). Most good IDEs allow you to set this, regardless of operating system used.
All patches or code committed must adhere to this style. Code style settings which can be imported into IntelliJ IDEA and Eclipse are committed in the project sources, in ide-settings.
Spelling
Ensure correct spelling in code, comments, Javadocs, etc. (use American English spelling). It is recommended that you use a spellchecker plugin for your IDE.
License header
All source files must have up-to-date license headers as described in Copyright Ownership and Licenses. Never remove existing headers or copyrights.
Check-in comments
Please ensure any commit comments use this format if related to a task or issue in JIRA. This helps JIRA pick out these checkins and display them on the issue, making it very useful for back/forward porting fixes. If your comment does not follow this format, your commit may not be merged into upstream.
Configuration
Infinispan offers both programmatic configuration and XML configuration. For more information read the Configuration chapter.
Logging
From Infinispan 5.0 onwards, Infinispan uses JBoss Logging to abstract over the logging backend. Infinispan supports localization of log message for categories of INFO or above as explained in the JBoss Logging guidelines. As a developer, this means that for each INFO, WARN, ERROR, FATAL message your code emits, you need to modify the Log class in your module and add an explicit method for it with the right annotations. For example:
@LogMessage(level = INFO)
@Message(value = "An informative message: %s - %s", id = 600)
void anInformativeMessage(String param1, String param2);
And then, instead of calling log.info(...), you call the method, for example log.anInformativeMessage(param1, param2). If what you're trying to log is an error or similar message and you want an exception to be logged as cause, simply use @Cause annotation, example:
@LogMessage(level = ERROR)
@Message(value = "An error message: %s", id = 600)
void anErrorMessage(String param1, @Cause IllegalStateException e);
The last thing to figure out is which id to give to the message. Each module that logs something in production code that could be internationalized has been given an id range, and so the messages should use an available id in the range for the module where the log call resides. Here are the id range assignments per module:
|
Module name |
Id range |
|
core |
1 - 1000 |
|
tree |
1001 - 2000 |
|
bdbje cache store |
2001 - 3000 |
|
cassandra cache store |
3001 - 4000 |
|
hotrod client |
4001 - 5000 |
|
server core |
5001 - 6000 |
|
server hotrod |
6001 - 7000 |
|
cloud cache store |
7001 - 8000 |
|
jdbc cache store |
8001 - 9000 |
|
jdbm cache store |
9001 - 10000 |
|
remote cache store |
10001 - 11000 |
|
server memcached |
11001 - 12000 |
|
server rest |
12001 - 13000 |
|
server websocket |
13001 - 14000 |
|
query |
14001 - 15000 |
|
lucene directory |
15001 - 16000 |
|
rhq plugin |
16001 - 17000 |
|
cdi integration |
17001 - 18000 |
You will need to enable annotation processing in order to be able to compile Infinispan and have the logger implementation generated.
Source Control
As a convention, upstream is used as the name of the http://github.com/infinispan/infinispan repository. This repository is the canonical repository for Infinispan.
requisites
This document assumes some working knowledge of git. We recommend Scott Chacon's excellent Pro Git as a valuable piece of background reading. The book is released under the Creative Commons license and can be downloaded in electronic form for free At very least, we recommend that Chapter 2, Chapter 3 and Chapter 5 of Pro Git are read before proceeding.
Repositories
Infinispan uses http://github.com/infinispan/infinispan as its canonical repository, and this repository contains the stable code on master (currently Infinispan 5.x) as well as the maintenance branches for 4.2.x, 4.1.x and 4.0.x.
Typically, only Project Admins would be able to push to this repo while all else may clone or fork this repo.
Roles
The project assumes one of 3 roles an individual may assume when interacting with the Infinispan codebase. The three roles here are:
-
Project Admin (typically, no more than 3 or 4 people)
-
Frequent Contributor
-
Occasional Contributor
None of the roles assume that you are a Red Hat employee. All it assumes is how much responsibility over the project has been granted to you. Typically, someone may be in more than one role at any given time, and puts on a different "hats" based on the task at hand.
Occasional Contributor
This role defines a user who browses through the source code of the project and occasionally submits patches. Patches may be submitted in one of two ways:
-
Attach a patch file to the JIRA issue
-
Creating a pull request on GitHub
The approach a contributor chooses to use depends entirely his/her personal preference, but usually is tied to how the contributor accesses Infinispan's source code. If the contributor directly clones the upstream repository, they should submit patch files. If the contributor instead uses their personal GitHub account to fork the upstream repository, then they are should issue a pull request.
A GitHub pull request is the preferred method to submit a patch!
Attach a patch file to the JIRA issue

In this workflow, the contributor directly clones the upstream repository, makes changes to his local clone, adequately tests and commits his work with proper comments (more on commit comments later), and generates a patch. The patch should then be attached to the JIRA issue.
More information on generating patches suitable for attaching to a JIRA can be found in Chapter 5, Section 2 of Pro Git, under the section titled Public Large Project .
Rather than emailing the patches to a developer mail list, please attach your patch to the JIRA issue.
Creating a pull request on GitHub
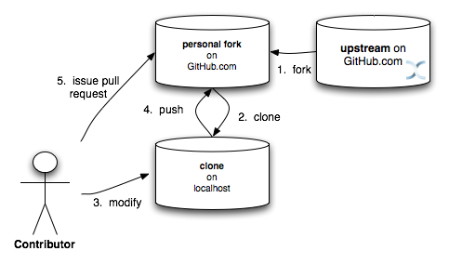
In this workflow, the contributor forks the Infinispan upstream repository on GitHub, clones their fork, and makes changes to this private fork. When changes have been tested and are ready to be contributed back to the project, a pull request is issued via GitHub so that one of the Project Administrators can pull in the change.
Topic Branches
It is desirable to work off a topic branch, even when using your own, forked repository. A topic branch is created for every feature or bug fix you do. Typically you would create one topic branch per issue, but if several patches are related it's acceptable to have several commits in the same branch; however different changes should always be identified by different commits.
Before you push your work onto your fork of the repository, it is often a good idea to review your commits. Consolidating them (squashing) or breaking them up as necessary and cleaning up commit messages should all be done while still working off your local clone. Also, prior to issuing a pull request, you should make sure you rebase your branch against the upstream branch you expect it to be merged into. Also, only submit pull requests for your branch - not for your master!
The section on Public Small Project in Chapter 5, Section 2 of Pro Git has more information on this style of workflow.
A worked example
-
Make sure your master is synced up with upstream. See this section for how to do this
-
Create new branch for your topic and switch to it. For the example issue, ISPN-1234:
git checkout -b ISPN-12345 master
-
Do your work. Test. Repeat
-
Commit your work on your topic branch
-
Push your topic branch to GitHub. For example:
git push origin ISPN-12345
-
Issue a pull request using the GitHub pull request system
-
Once your pull request has been applied upstream, delete the topic branch both locally and on your fork. For example:
git branch -d ISPN-12345 && git push origin :ISPN-12345
-
Sync with upstream again so that your changes now appear in your master branch
If your topic branch has been open for a while and you are afraid changes upstream may clash with your changes, it makes sense to rebase your topic branch before you issue a pull request. To do this:
-
Sync your master branch with upstream
git checkout master
git pull upstream master
-
Switch to your topic branch. For example:
git checkout ISPN-12345
-
Rebase your topic branch against master:
git rebase master
-
During the rebase process you might need to fix conflicts;
-
when you're done test your code again.
-
Push your rebased topic branch to your repo on GitHub (you will likely need to force this with the -f option).
git push -f origin ISPN-12345
-
Continue your work on your topic branch.
If you are sharing your forked Infinispan repo with others, then do not rebase! Use a merge instead.
Multi-step coordination between developers using forked repositories
Sometimes a feature/task is rather complex to implement and requires competence from multiple areas of the projects. In such occasions it is not uncommon for developers to coordinate feature implementation using personal forks of Infinispan prior to finally issuing request to integrate into Infinispan main repository on GitHub.
For example, developer A using his personal Infinispan fork creates a topic branch T and completes as much work as he/she can before requesting for assistance from developer B. Developer A pushes topic T to his personal Infinispan fork where developer B picks it up and brings it down to his local repo. Developer B then in turn completes necessary work, commits his/her changes on branch T, and finally pushes back T to his own personal fork. After issuing request for pull to developer A, developer B waits for notification that developer A integrated his changes. This exchange can be repeated as much as it is necessary and can involve multiple developers.
A worked example
This example assumes that developer A and B have added each others Infinispan forked repositories with the git add remote command. For example, developer B would add developer A's personal Infinispan fork repository with the command
git remote add devA https://github.com/developerA/infinispan.git]
-
Developer A starts implementing feature ISPN-244 and works on a local topic branch ispn244
Developer A pushes ispn244 to personal Infinispan fork. For example:git push origin ispn244
-
Developer B fetches branch ispn244 to local repository. For example:
git fetch devA ispn244:my_ispn244
-
Developer B works on local branch my_ispn244
-
Developer B commits changes, pushes my_ispn244 to own fork.
git push origin my_ispn244
-
Developer B sends pull request to developer A to integrate changes from my_ispn244 to ispn244
Frequent Contributor
A frequent contributor will only ever submit patches via a pull requests. The pull request will be submitted via GitHub.
Frequent contributors should always fork the upstream project on GitHub and work off a clone of this fork. This is very similar to Creating a pull request on GitHub workflow used by a Occasional Contributor.
All Infinispan core developers are considered frequent contributors and work off personal forks of the upstream repository. This allows for complex features to be developed in parallel without tripping up over one another. This process is certainly not restricted to just Infinispan core developers; any contributor is welcome to also participate in this manner.
Project Admin
Project Admins have a very limited role. Only Project Admins are allowed to push to upstream, and Project Admins never write any code directly on the upstream repository. All Project Admins do is pull in and merge changes from contributors (even if the "contributor" happens to be themselves) into upstream, perform code reviews and either commit or reject such changes.
All Contributors who are also Project Admins are encouraged to not merge their own changes, to ensure that all changes are reviewed.
This approach ensures Infinispan maintains quality on the main code source tree, and allows for important code reviews to take place again ensuring quality. Further, it ensures clean and easily traceable code history and makes sure that more than one person knows about the changes being performed.
Merging in patches

Patches submitted via JIRA are audited and promoted to the upstream repository as detailed above. A Project Admin would typically create a working branch to which the patch is applied and tested. The patch can be further modified, cleaned up, and commit messages made clearer if necessary. The branch should then be merged to the master or one of the maintenance branches before being pushed.
More information on applying patches can be found in Chapter 5, Section 3 of Pro Git, under Applying Patches From Email.
Handling pull requests

Project Admins are also responsible for responding to pull requests. The process is similar to applying a patch directly, except that when pulling in changes from a forked repository, more than a single commit may be pulled in. Again, this should be done on a newly created working branch, code reviewed, tested and cleaned up as necessary.
If commits need to be altered - e.g., rebasing to squash or split commits, or to alter commit messages - it is often better to contact the Contributor and ask the Contributor to do so and re-issue the pull request, since doing so on the upstream repo could cause update issues for contributors later on. If commits were altered or three-way merge was performed during a merge instead of fast-forward, it's also a good idea to check the log to make sure that the resulting repository history looks OK:
$ git log --pretty=oneline --graph --abbrev-commit  # History messed up due to a bad merge
*   3005020 Merge branch 'ISPN-786' of git://github.com/Sanne/infinispan
|\
| * e757265 ISPN-786 Make dependency to log4j optional  <-- Same with cb4e5d6 - unnecessary
* | cb4e5d6 ISPN-786 Make dependency to log4j optional  <-- Cherry-picked commit by other admin
|/
* ...

$ git reset cb4e5d6  # revert the bad merge
It is therefore strongly recommended that you use the handle_pull_request script that ensures a clean merge. If you still wish to do this manually, please consider reading through the script first to get an idea of what needs to happen.
More information on pulling changes from remote, forked repos can be found in Chapter 5, Section 3 of Pro Git, under Checking Out Remote Branches .
Possible trouble handling pull requests
-
If you have warnings about "Merge made by recursive" you have to fix it rebasing.
-
If you have warnings about "non-fast-forward" you have to rebase.
-
If you see "non-fast-forward updates were rejected" you shall never use "force" on upstream! It means that another patch was merged before you and you have to update your master again, and rebase again.
-
"force" is allowed only in special maintenance circumstances. If you find you're needing it to handle a pull request, then you're doing it wrong, and the mistake might be a dangerous one! It's like the good rule of never commit when you're drunk (coding is allowed).
Never use force on git push
Using -f while pushing on a shared repository such as upstream you could effectively erase other committed patches. Noone shall ever use this option unless unanimously approved on the public mailing list: the most dangerous aspect of it is that nobody get any notification if this happens, and we might think issues are solved but you silently removed the fix and it's history from the repository.
Cutting releases
Releases can only me cut by Project Admins, and must be done off a recently updated (git fetch and git pull origin) clone of the upstream repo. Infinispan's release.py script takes care of the rest.
Committing your work
Release branches
Infinispan has 4 main release branches. These are master (ongoing work on the 5.0.x series), 4.2.x (ongoing work on the 4.2.x series), 4.1.x and 4.0.x (respective maintenance branches). Work should never be committed directly to any of these release branches; topic branches should always be used for work, and these topic branches should be merged in.
Topic branches
Some of the biggest features of git are speed and efficiency of branching, and accuracy of merging. As a result, best practices involve making frequent use of branches. Creating several topic branches a day, even, should not be considered excessive, and working on several topic branches simultaneously again should be commonplace.
Chapter 3, Section 4 of Pro Git has a detailed discussion of topic branches. For Infinispan, it makes sense to create a topic branch and name it after the JIRA it corresponds to. (if it doesn't correspond to a JIRA, a simple but descriptive name should be used).
Topic Branches Affecting More Than One Release Branch
Most topic branches will only affect a single release branch, e.g. Infinispan 5.0 features only affect the master release branch, so a topic branch should be created based off master. However, occasionally, fixes may apply to both release branches 4.2.x as well as master. In this case, the following workflow should apply:
-
Create topic branch off 4.2.x. For example:
git checkout -b <topic>_4.2.x 4.2.x
-
Create topic branch off master. For example:
git checkout -b <topic>_master master
-
Do your work on <topic>_master, test and commit your fixes
-
Switch to {{<topic>_4.2.x}. For example:
git checkout <topic>_4.2.x
-
Cherry-pick your commit on <topic>_master onto <topic>_4.2.x. For example:
git cherry-pick <commit_id>
-
Test <topic>_4.2.x for correctness, modify as necessary
-
Issue pull requests for both topic branches
Comments
It is extremely important that comments for each commit are clear and follow certain conventions. This allows for proper parsing of logs by git tools. Read this article on how to format comments for git and adhere to them. Further to the recommendations in the article, the short summary of the commit message should be in the following format:
ISPN-XXX - Subject line of the JIRA in question
This should be followed by a detailed explanation of the commit. Why it was done, how much of it. was completed, etc. You may wish to express this as a list, for example:
* Add a unit test
* Add more unit tests
* Fix regressions
* Solve major NP-Complete problems
Commits
Sometimes work on your topic branch may include several commits. For example, committing a test. Then committing another test. Then perhaps committing a fix. And perhaps fixing the fix in the next commit ![]() . Before issuing a pull request for this topic branch, consider cleaning up these commits. Interactive rebasing helps you squash several commits into a single commit, which is often more coherent to deal with for others merging in your work. Chapter 6, Section 4 of Pro Git has details on how to squash commits and generally, clean up a series of commits before sharing this work with others.
. Before issuing a pull request for this topic branch, consider cleaning up these commits. Interactive rebasing helps you squash several commits into a single commit, which is often more coherent to deal with for others merging in your work. Chapter 6, Section 4 of Pro Git has details on how to squash commits and generally, clean up a series of commits before sharing this work with others.
Also, it is important to make sure you don't accidentally commit files for which no real changes have happened, but rather, whitespace has been modified. This often happens with some IDEs. git diff --check should be run before you issue such a pull request, which will check for such "noise" commits and warn you accordingly. Such files should be reverted and not be committed to the branch.
Further, adhering to Infinispan's code style guidelines will help minimise "noise" commits. Project Admins should feel free to ask contributors to reformat their code if necessary.
Keeping your repo in sync with upstream
If you have cloned upstream
If you have a clone of the upstream, you may want to update it from time to time. Running:
$ git fetch origin
$ git fetch origin --tags
will often do the trick. You could then pull the specific branches you would need to update:
$ git checkout master
$ git pull origin master
$ git checkout 4.2.x
$ git pull origin 4.2.x
Updating topic branches
You should rebase your topic branches at this point so that they are up-to-date and when pulled by upstream, upstream can fast-forward the release branches:
$ git checkout <topic>_master
$ git rebase master
and/or
$ git checkout topic_4.2.x
$ git rebase 4.2.x
If you have forked upstream
If you have a fork of upstream, you should probably define upstream as one of your remotes:
$ git remote add upstream git://github.com/infinispan/infinispan.git
You should now be able to fetch and pull changes from upstream into your local repo, though you should make sure you have no uncommitted changes. (You do use topic branches, right?)
$ git fetch upstream
$ git fetch upstream --tags
$ git checkout master
$ git pull upstream master
$ git push origin master
$ git checkout 4.2.x
$ git pull upstream 4.2.x
$ git push origin 4.2.x
A script can do this for you - have a look at sync_with_upstream.
Updating topic branches
Again, you should rebase your topic branches at this point so that they are up-to-date and when pulled by upstream, upstream can fast-forward the release branches:
$ git checkout topic_master
$ git rebase master
and/or
$ git checkout topic_4.2.x
$ git rebase 4.2.x
The sync_with_upstream script can do this for you if your topic branch naming conventions match the script.
Tips on enhancing git
Auto-completions
Save this script as /.git-completion.bash and in /.bash_profile, add the following on one line:
source ~/.git-completion.bash
After logging out and back in again, typing git <TAB> will give you a list of git commands, as would git c<TAB>, etc. This even works for options, e.g. git commit --<TAB>. The completions are even aware of your refs, so even git checkout my_br<TAB> will complete to git checkout my_branch!
Note that you get git autocompletion for free if you use zsh instead of bash.
Terminal colours
Add the following to your ~/.gitconfig
[color]
    ui = yes
[color "branch"]
     current = yellow reverse
     local = yellow
     remote = green
[color "diff"]
     meta = yellow bold
     frag = magenta bold
     old = red bold
     new = green bold
[color "status"]
     added = yellow
     changed = green
     untracked = cyan
Aliases
Some git commands are pretty long to type, especially with various switches. Aliases help you to map shortcuts to more complex commands.; Again, For example, add the followin to ~/.gitconfig:
[alias]
     co = checkout
     undo = reset --hard
     cb = checkout -b
     br = branch
     cp = cherry-pick
     st = status
     l = log --pretty=oneline --decorate --abbrev-commit
     lg = log --decorate --abbrev-commit
     last = log --decorate -1 -p --abbrev-commit
     ci = commit -a
     pom = push origin master
     graph = log --pretty=oneline --graph --abbrev-commit
     dt = difftool
Visual History
Git ships with gitk, a GUI that visually represents a log. If you use Mac OS X, GitX is a good alternative. Try typing gitk or gitx in a git project directory.
Visual diff and merge tools
There are several options available, including KDiff3, meld and Perforce's P4Merge which are all either open source or available for free. See this link on setting these up (section under External Merge and Diff Tools)
Choosing an Editor
You can customise the editor used by git editing ~/.gitconfig. The following fires up MacVIM instead of the default vi editor:
[core]
     editor = mvim -f
Alternatively, you could fire up TextMate or another editors of your choice.
Shell prompt
You can change your Bash shell prompt to print the current repository's branch name. Add the following to your ~/.bashrc:
function git_current_branch {
  git branch --no-color 2> /dev/null | sed -e '/^[^*]/d' -e 's/* \(.*\)/[\1]/'
}

if [ "$PS1" ]; then
  PS1='[\u@\h:\W]$(git_current_branch)\$ '
fi
The resulting shell prompt will look like:
trustin@matrix:infinispan-4.2][4.2.x]$
If you're a ZSH user, you can get even more interesting branch information thanks to this blog post, such as:
-
whether your branch is dirty (⚡)
-
whether it's ahead of the remote(↑)
-
whether it diverges with the remote (↕)
-
whether it's behind (↓)
For example, the following prompt indicates that the current branch is 't_ispn775_master' and that the branch is dirty:
~/Go/code/infinispan.git]% (t_ispn775_master⚡)
Building Infinispan
Infinispan uses Maven as a build system.
Requirements
-
Java 6.0 or above
-
Maven 3 or above
Make sure you follow the steps outlined in Maven Getting Started - Users to set up your JBoss repository correctly. This step is crucial to ensure your Maven setup can locate JBoss artifacts!
Quick command reference
Maven places it's output in target/
|
mvn clean |
Cleans out any old builds and binaries |
|
mvn compile |
Compiles java source code |
|
mvn test |
Runs the TestNG unit test suite on the compiled code. Will also compile the tests. See the testing section below for more information on running different test groups. The default test group run is the "unit" group. |
|
mvn package |
Packages the module as a JAR file, the resulting JAR file will be in target/ |
|
mvn package -Dmaven.test.skip.exec=true |
Creates a JAR file without running tests |
|
mvn package -Dmaven.test.skip.exec=true -P minimal-distribution |
Creates a reduced version of the distribution with all modules,scripts...etc but no javadoc or source code. This is very handy to quickly build the distribution in order to run some tests. |
|
mvn install -Dmaven.test.skip.exec=true |
Installs the artifacts in your local repo for use by other projects/modules, including inter-module dependencies within the same project. |
|
mvn install -P distribution |
In addition to install, will also use Maven's assembly plugin to build ZIP files for distribution (in target/distribution). Contents of various distribution are controlled by the files in src/main/resources/assemblies. |
|
mvn deploy |
Builds and deploy the project to the JBoss snapshots repository. |
|
mvn -Pgenerate-schema-doc install -DskipTests=true -pl core && firefox core/target/xsd_doc |
Builds the configuration reference HTML file |
|
mvn install -P-extras |
Avoids the extras profile disables the enforce plugin, generation of source jars and OSGI bundleconstruction, hence making builds run faster. Clearly, this option should not be used when making a release or publishing a snapshot. |
For non-snapshot releases (e.g., alphas, betas, release candidates and final releases) you should use the bin/release.py script.
Publishing releases to Maven
To be able to publish releases to Maven, you need to have the following in your ${HOME}/.m2/settings.xml file:
<settings>
  ...
  <servers>
    ...
    <server>
      <id>jboss-snapshots-repository</id>
      <username>your JBoss.org username</username>
      <password>your JBoss.org password</password>

    </server>
    <server>
      <id>jboss-releases-repository</id>
      <username>your JBoss.org username</username>
      <password>your JBoss.org password</password>

    </server>
    ...
  </servers>
  ...
</settings>
Publishing snapshots
Simply running
$ mvn clean deploy -Dmaven.test.skip.exec=true
in the Infinispan root directory will deploy a snapshot.
Publishing releases
Use the bin/release.py script.
The Maven Archetypes
Infinispan currently has 2 separate Maven archetypes you can use to create a skeleton project and get started using Infinispan. This is an easy way to get started using Infinispan as the archetype generates sample code, a sample Maven pom.xml with necessary depedencies, etc.
You don't need to have any experience with or knowledge of Maven's Archetypes to use this! Just follow the simple steps below.
These archetypes have only been tested with Maven 3. Please report back if you have any success with using Maven 2.
Starting a new project
Use the newproject-archetype project. The simple command below will get you started, and
$ mvn archetype:generate \
    -DarchetypeGroupId=org.infinispan.archetypes \
    -DarchetypeArtifactId=newproject-archetype \
    -DarchetypeVersion=1.0.5 \
    -DarchetypeRepository=http://repository.jboss.org/nexus/content/groups/public
You will be prompted for a few things, including the artifactId , groupId and version of your new project. And that's it - you're ready to go!
Exploring your new project
The skeleton project ships with a sample application class for interacting with Infinispan. You can open this new project in your IDE - most good IDEs such as IntelliJ and Eclipse allow you to import Maven projects, see this guide and this guide. Once you open your project in your IDE, you should examine the generated classes and read through the comments.
On the command line...
Try running
$ mvn install -Prun
in your newly generated project. This runs the main() method in the generated application class.
Writing a test case for Infinispan
This archetype is useful if you wish to contribute a test to the Infinispan project and helps you get set up to use Infinispan's testing harness and related tools.
Use
$ mvn archetype:generate \
    -DarchetypeGroupId=org.infinispan.archetypes \
    -DarchetypeArtifactId=testcase-archetype \
    -DarchetypeVersion=1.0.5 \
    -DarchetypeRepository=http://repository.jboss.org/nexus/content/groups/public
As above, this will prompt you for project details and again as above, you should open this project in your IDE. Once you have done so, you will see some sample tests written for Infinispan making use of Infinispan's test harness and testing tools along with extensive comments and links for further reading.
On the command line...
Try running
$ mvn test
in your newly generated project to run your tests.
The generated project has a few different profiles you can use as well, using Maven's -P flag. For example:
$ mvn test -Pudp
Available profiles
The profiles available in the generated sample project are:
-
udp: use UDP for network communications rather than TCP
-
tcp: use TCP for network communications rather than UDP
-
jbosstm: Use the embedded JBoss Transaction Manager rather than Infinispan's dummy test transaction manager
Contributing tests back to Infinispan
If you have written a functional, unit or stress test for Infinispan and want to contribute this back to Infinispan, your best bet is to fork the Infinispan sources on GitHub. The test you would have prototyped and tested in an isolated project created using this archetype can be simply dropped in to Infinispan's test suite. Make your changes, add your test, prove that it fails even on Infinispan's upstream source tree and issue a pull request.
{tip:title=New to working with Infinispan and GitHub?
Want to know how best to work with the repositories and contribute code? Read Infinispan and Git
Versions
The archetypes generate poms with dependencies to specific versions of Infinispan. You should edit these generated poms by hand to point to other versions of Infinispan that you are interested in.
Source Code
The source code used to generate these archetypes are on GitHub. If you wish to enhance and contribute back to the project, fork away!
API, Commons and Core
In order to provide proper separation between public APIs, common utilities and the actual implementation of Infinispan, these are split into 3 modules: infinispan-api, infinispan-commons and infinispan-core. This separation also makes sure that modules, such as the remote clients, don't have to depend on infinispan-core and its transitive dependencies. The following paragraphs describe the role of each of these modules and give indication as to what goes where.
API
The infinispan-api module should only contain the public interfaces which can be used in any context (local, remote, etc). Any additions and/or modifications to this module must be discussed and approved by the team beforehand. Ideally it should not contain any concrete classes: rare exceptions may be made for small, self-contained classes which need to be referenced from the API interfaces and for which the introduction of an interface would be deemed cumbersome.
Commons
The infinispan-commons module contains utility classes which can be reused across other modules. Classes in infinispan-commons should be self-contained and not pull in any dependencies (apart from the existing jboss-logging and infinispan-api). They should also make no reference to configuration aspects specific to a particular environment.
Core
The infinispan-core module contains the actual implementation used for local/embedded mode. When adding new functionality to the APIs, it is generally safe to start by putting them in infinispan-core and promoting them to infinispan-api only when it is deemed to do so and it makes sense across the various use-cases.
Running and Writing Tests
Tests are written using the TestNG framework.
Running the tests
The default run executes all tests in the functional and unit groups. To just run the tests with txt and xml output the command is:
$ mvn test
Alternatively, you can execute the tests and generate a report with:
$ mvn surefire-report:report
Specifying which tests to run
A single test can be executed using the test property. The value is the short name (not the fully qualified package name) of the test. For example:
$ mvn -Dtest=FqnTest test
Alternatively, if there is more than one test with a given classname in your test suite, you could provide the path to the test.
$ mvn -Dtest=org/infinispan/api/MixedModeTest test
Alternatively, you can always pass your own Log4j configuration file via -Dlog4.configuration with your own logging settings.
Pattens are also supported:
$ mvn -Dtest=org/infinispan/api/* test
Skipping the test run
It is sometimes desirable to install the Infinispan package in your local repository without performing a full test run. To do this, simply use the maven.test.skip.exec property:
$ mvn -Dmaven.test.skip.exec=true install
Note that you should never use -Dmaven.test.skip=true since modules' test classes depend on other module test classes, and this will cause compilation errors.
Running tests using @Parameters
If you want to execute tests relying on TestNG's @Parameters from an IDE (such as Eclipse or IntelliJ IDEA), please check this blog entry.
Enabling TRACE in test logs
When you run tests, you can get TRACE logging via using the traceTests profile
mvn test -PtraceTests
Executing this will generate a GZIP file called trace-infinispan.log.gz. This file is not fully closed, so to extract the log file, execute:
gunzip -c trace-infinispan.log.gz > trace-infinsipan.log
Test groups
Each test should belong to one or more group. The group acts as a filter, and is used to select which tests are ran as part of the maven test lifecycle.
Which group should I use?
If your test does not fit into one of these group, a new group should be added.
|
unit |
Unit tests using stubs to isolate and test each major class in Infinispan. This is the default group run if no test group is specified |
|
functional |
Tests which test the general functionality of Infinispan |
|
jgroups |
Tests which need to send data on a JGroups Channel |
|
transaction |
Tests which use a transaction manager |
|
profiling |
Tests used for manual profiling, not meant for automated test runs |
|
manual |
Other tests that are run manually |
Every test (except those not intended to be run by Hudson) should at least be in the functional or unit groups, since these are the default test groups executed by Maven, and are run when preparing a release.
Test permutations
We use the term permutation to describe a test suite execution against a particular configuration. This allows us to test a variety of environments and configurations without rewriting the same basic test over and over again. For example, if we pass JVM parameter -Dinfinispan.test.jgroups.protocol=udp test suite is executed using UDP config.
$ mvn -Dinfinispan.test.jgroups.protocol=udp test
Each permutation uses its own report directory, and its own html output file name. This allows you to execute multiple permutations without wiping the results from the previous run. Note that due to the way Maven operates, only one permutation can be executed per mvn command. So automating multiple runs requires shell scripting, or some other execution framework to make multiple calls to Maven.
Running permutations manually or in an IDE
Sometimes you want to run a test using settings other than the defaults (such as UDP for jgroups group tests or the DummyTransactionManager for transaction group tests). This can be achieved by referring to the Maven POM file to figure out which system properties are passed in to the test when doing something different. For example to run a jgroups group test in your IDE using TCP instead of the default UDP, set -Dinfinispan.test.jgroups.protocol=tcp. Or, to use JBoss JTA (Arjuna TM) instead of the DummyTransactionManager in a transaction group test, set -Dinfinispan.test.jta.tm=jbosstm Please refer to the POM file for more properties and permutations.
The Parallel Test Suite
Infinispan runs its unit test suite in parallel; Infinispan tests are often IO rather than processor bound, so executing them in parallel offers significant speed up.
Tips for writing and debugging parallel tests
There are a number of constraints and best practices that need to be followed in order to ensure correctness and keep the execution time to a minimum. If you follow these guidelines you will find your tests are more reliable:
Each test class is run in a single thread
There is no need to synchronize unit test's fixture, as test methods will be run in sequence. However, multiple test classes are executed in parallel.
Each test class must have an unique test name
As a convention, the name of the test should be the FQN of the test class with the org.infinispan prefix removed. For example, given a test class org.infinispan.mypackage.MyTest the name of the test should be mypackage.MyTest. This convention guarantees a unique name.
MyTest.java
package org.infinispan.mypackage;
@Test (testName = "mypackage.MyTest")
public class MyTest { ... }
Use TestCacheManagerFactory.createXyzCacheManager and _never_create managers using new DefaultCacheManager()
This ensures that there are no conflicts on resources e.g. a cluster created by one test won't interfere with a cluster created by another test.
Where possible, extend SingleCacheManagerTestorMultipleCacheManagersTest
Tests inheriting from these template method classes will only create a cache/cluster once for all the test methods, rather than before each method. This helps keep the execution time down.
Never rely onThread.sleep()
When running in heavily threaded environments this will most often not work. For example, if using ASYNC_REPL, don't use a sleep(someValue) and expect the data will be replicated to another cache instance after this delay has elpased. Instead, use a ReplicationListener (check the javadoc for more information). Generally speaking, if you expect something will happen and you don't have a guarantee when, a good approach is to try that expectation in a loop, several times, with an generous (5-10secs) timeout. For example:
while (Systet.currentTimeMillis() - startTime < timeout) {
   if (conditionMeet()) break;
   Thread.sleep(50);
}
Thread.sleep(10) may not work in certain OS/JRE combos (e.g. Windows XP/Sun JRE 1.5)
Use values grater than 10 for these statements, e.g. 50. Otherwise, a System.currentTimeMillis() might return same value when called before and after such a sleep statement.
JMX
For each cache that is create with TestCacheManagerFactory.createXyzCacheManager() the test harness will allocate a unique JMX domain name which can be obtained through CacheManager.getJmxDomain(). This ensures that no JMX collisions will takes place between any tests executed in parallel. If you want to enforce a JMX domain name, this can be done by using one of the TestCacheManagerFactory.createCacheManagerEnforceJmxDomain methods. These methods must be used with care, and you are responsible for ensuring no domain name collisions happen when the parallel suite is executed.
Use obscure words
Insert uncommon or obscure words into the cache that has been generated with a random word generator. In a multi-threaded environment like Infinispan's testsuite, grepping for these words can greatly help the debugging process. You may find this random word generator useful.
Use the test method name as the key
Grab the test method and use it as part of the cached key. You can dynamically grab the test method using code like this:
Thread.currentThread().getStackTrace()(1).getMethodName()
Even though we've tried to reduce them to a min, intermittent failures might still appear from time to time. If you see such failures in existing code please report them in the issue tracker.
Helping Others Out
Infinispan is reliant on the whole community helping each other out. Less experienced contributors are often able to help out answering the "newbie" questions, leaving more experienced contributors to handle the more complex questions.
Users are encouraged to follow the How to ask a forum question guide.
Forum discussions can be posed as questions (we encourage people to do this). Questions can be marked as answered, indicating to the community that they no longer require answering, allowing easy tracking of open questions. Open questions can be easily viewed using this filter. Community members are encouraged to regularly view the open questions and answer any questions they can.
In order to track what questions are still open, you are encouraged to mark questions as "assumed answered" if you provide information that you think resolves the query and you don't hear back to the contrary after a week or so.
Approximately every month, a member of the Infinispan team will go through any open questions for the past month and clear up any unanswered questions, either by chasing for an answer from core team, or by checking with the user if they require more info.
Adding Configuration
Introduction
Infinispan configuration is represented by the Configuration class, and Configuration is the root of the configuration class hierarchy. Every class class in the configuration hierarchy is annotated with JAXB annotations.
Java Architecture for XML Binding (JAXB)
JAXB is a library that allows Java developers to map Java classes to XML representations. JAXB provides two main features: the ability to marshall Java objects into XML and the inverse, the ability to un-marshall XML back into Java objects.
The JAXB annotations provides directives on to JAXB on how to un-marshall Infinispan XML configuration file into Infinispan configuration object model. In addition to un-marshalling, JAXB annotated class hierarchy is produces an XML Schema that each configuration file must adhere to in order to be considered valid.
An Infinispan XML configuration file consists of XML elements and attributes. The Infinispan configuration class hierarchy has an obvious mapping between the XML elements and the classes as well as the XML attributes and the Java primitives defined in those classes. Take, for example, the AbstractCacheStoreConfig class; some fields of AbstractCacheStoreConfig are Java primitives which match XML attributes in element loader, while other fields are non-primitives which match XML elements that are children of the loader element. All fields and class declarations are annotated with JAXB annotation as needed.
Compatibility during minor and micro releases
We allow the introduction of additional elements and attributes between minor version however we do not allow the removal of existing elements and attributes. There must not be any structural changes of existing elements. For example, we cannot change the parent of existing elements to another node (e.g. the locking element's parent being changed from <default> or <namedCache> to <transaction>.
If you need to add a new attribute to the XML configuration, follow these steps:
-
Locate the desired enclosing element and the matching class representation.
-
Add a new field (protected visibility) in the matching class for the desired primitive. The name of the field will automatically become the corresponding attribute name in the matching XML element. Use Java primitive wrapper class rather than primitive itself. Optionally initialize the default value of the field.
-
Annotate the setter method for that field with @XmlAttribute.
-
Add an @ConfigurationDoc and/or @ConfigurationDocRef.
Note that the class containing the property must be annotated with @XmlAccessorType(PROPERTY ) or @XmlAccessorType(.PUBLIC_MEMBER) and not @XmlAccessorType(.FIELD). If you do not do this, JAXB may complain about and improper mapping or it may not invoke the setter during un-marshalling.
If a new XML element is added then a new, matching Java class must be created as well. Follow instructions for adding new fields and do not forget to annotate the field that declares a reference to the new class. In this case the field should be annotated with @XmlElement rather than @XmlAttribute. See the current code base for examples.
Unit tests
Every time a new attribute or an element is added the change should be unit tested in XmlFileParsingTest. Verify that the generated schema is correct. The generated schema is in infinispan/core/target/classes/schema directory. You need to run mvn process-classes (or a phase which occurs later in the lifecycle such as package or install) in order to generate the schema.
Configuration HTML reference
The Infinispan project uses the configuration class hierarchy to create an HTML configuration reference using [ a doclet|http://infinispan.sourceforge.net/4.0/apidocs/org/infinispan/tools/doclet/config/ConfigHtmlGenerator.html]. However, not all information we need to create a human readable HTML reference is available in the class hierarchy and the accompanying JAXB annotations. Infinispan requires that you annotate fields, setter methods and classes with @ConfigurationDoc and @ConfigurationDocRef.
Preview the HTML reference
To generate a preview of the configuration, use:
mvn -Pconfigdoc install -DskipTests=true
The generated HTML file is in target/site/apidocs/config.html.
Writing Documentation and FAQs
Introduction
Infinispan uses this Confluence instance to store documentation and FAQs. The documentation is organised into:
|
|
|
Future plans |
|
Tutorials for using Infinispan |
This will be developed into a Getting Started Guide, where each tutorial as an associated quickstart example |
|
|
Goes into depth on using and configuring Infinispan |
This will be split into a Developer Reference Guide, a Configuration Guide and a Tuning Guide |
|
|
An explanation of the terminology used by Infinispan |
|
|
|
Contains both product and technical FAQs |
Each Q&A will be moved into a document and included into the outline document |
Editing and adding pages on Confluence is restricted to regular contributors to Infinispan (if you think you should have access, or want to become a regular contributor to the documentation, then please email infinispan-dev@lists.jboss.org.
What goes where?
Infinispan has both this Confluence instance, and the SBS instance at http://community.jboss.org/wiki/Infinispan. Documentation and FAQs belong in Confluence, whilst design notes, meeting notes and user contributed articles belong on SBS.
Once the final set of guides (as described in the table above) is complete, there will be additional guidance here to describe how to decide which guide to place content in.
Wiki markup or rich text
You should always use wiki markup, it gives you much greater control over output format. The "Full notation guide" link in the "Help Tips" panel to the right (on the edit page) gives a full list of markup available.
Markup guide
This section discusses the typical markup you would use to write a documentation chapter. The Style and Grammar guide will discuss the writing style you should use.
Let's start at the beginning - headers, page structure, and the table of contents.
Headers, Page Structure and the Table of Contents
This Confluence instance is styled to produce structured documentation. Each node in the Infinispan space can have children, producing a tree of nodes. Note that pages are actually stored in a flat structure in the Infinispan space, they are just logically arranged into the tree. This means that URLs do not reflect the tree structure, and names of documents must be unique within the space.
The child nodes of the Infinispan space represent the various guides, and the FAQs. The child nodes of each guide represent the sections of the guides. Some sections of a guide may be further split into subsections stored in different pages (it is likely this was done because a section was getting large).
The include macro is used to display inline the contents of the various sub pages into the top level guide page, and if a section is made up of child pages, each child page should be inlined into the section page using the include macro.
The include macro is not automatically updated if you change a page name!
Confluence auto-generates the table of contents (using the toc macro) for the various guides, based on the headings used in the guide. As the include macro does not print the title of the page you are including, it is necessary to add the title above the include macro. You should not use the toc macro except on the main guide page.
h1 headers should only be used to name sections of guide, h2 headers to name sub-sections and so on. You should not skip header levels. Headings should follow the same capitalization rules as a sentence - only capitalize the first letter and proper nouns.
For an example, take a look at the wiki markup for the Contributing to Infinispan guide.
Marking up text
You will likely want to introduce some inline formatting for text. Here are the various styles you should use.
|
Style |
Use |
|
bold |
Bold should be used for emphasis only. You should never use another style to give emphasis. |
|
italic |
Italic should be used when you introduce a new piece of terminology. For example "Infinispan is a data grid". Further uses of the term do not need to be italicised. |
|
underline |
Underline should not be used |
|
strikethrough |
Strikethrough should not be used |
|
fixed width font |
A fixed width font should be used whenever you refer to a class, variable, method by name, whenever you make a reference to a path on filesystem, or whenever you refer to a command the user can execute. A fixed width font should be used when referring to a sequence of clicks required by a user in a GUI. the -> symbols should be used to indicate the transition through a nested menu. |
|
code block |
Should be used whenever you have a multi-line code example, or are expressing an instruction for a user to do something |
|
quotation |
Should be used whenever you refer to text someone, or something, else has written, for example the "Help Tips" on the right hand side of the edit page. You may wish to quote a statement to indicate that your text is not overly precise. Quotes should not be used to refer to a variable, class or method name, or a filesystem path or command |
|
blockquote |
Should be used for multiline quotes |
|
Color |
Colored text should not be used |
Lists and tables
Markup
You will normally wish to use an unordered list, however a numbered list is useful when expressing a set of steps the user should take. There are no "definition list" macros available in Confluence, so a table makes a good alternative.
You can make nested lists by using "double" markup.
Grammar in lists and tables
The trailing sentence in a list or a table should normally not have a full stop at the end.
Often, you will want to introduce a list or a table using a sentence. If you do this, a colon is often used to punctuate the end of the sentence, rather than a full stop/period.
Links
Links should be used as normal!
Admonitions
Confluence supports three admonition styles, and you are encouraged to use them in your documentation as they allow the flow of information to the reader to be controlled, by moving orthogonal information out of the main body of text.
|
tip |
A tip should be used when you want to convey useful information to the user. If the user does not read the tip, it will have no impact on them understanding your documentation, however they will gain useful extra information by reading the tip |
|
note |
A note should be used when you wish to convey extra information to the user. Without the information the user may struggle to completely understand your documentation |
|
warning |
A warning should be used when the there is some counter-intuitive information to be called out to the user. For example, that the following information is out of date. |
You can use the title attribute to give the admonition a title
Images and other media
If you are describing the use of a GUI, or showing results of some operation, images embedded in the page can bring the documentation to life for the reader. Images can be attached to the page using the Tools menu, and then linked. The "Full notation guide" discusses the syntax for embedding images. If you are embedding the image to describe a series of steps taken in a GUI, it is not necessary to title your image, otherwise you should give every image a title.
Giffy is supported in this Confluence instance, allowing you to easily create drawings online. For more, read the Giffy documentation for more information.
Confluence supports a charting macro, however it is recommended that you embed charts as images, generating the chart using your favourite program.
The use of the panel macro is not recommended.
Confluence allows you to natively embed video, however the use of this is not recommended, instead it is recommended the widget macro is used to connect to Vimeo or YouTube. The Screencasts section describes the creation of screencasts and upload of video to Vimeo or YouTube. To embed a video using the widget macro simply reference the URL to the video, for example:
{widget:url=http://au.youtube.com/watch?v=-dnL00TdmLY}
This produces
You can also embed Google Docs documents, Twitter searches, slide decks from SlideShare, and presentations from SlideRocket. Just follow the above example, substituting the URL for your media.
Code samples
Confluence includes a code macro, but unfortunately it is not very advanced. This Confluence instance also supports the snippet macro which can be used to include text from other sites. The use of the snippet macro is strongly recommended as it ensures that code samples do not get out of date. It is critical that you add a title to the your snippet, and it is also recommended you enable linenumbers and trim the text. For example
{snippet:title=My Code Sample|language=none|linenumbers=true|first=2|last=5|url=github.com/infinispan/infinispan/raw/master/README.mkdn}
Which results in:Code Snippet error: Unable to retrieve the URL: https://github.com/infinispan/infinispan/raw/master/README.mkdn status code: 404.
The snippet macro doesn't like the default "raw" link that GitHub provides. Instead, craft a URL like github.com/infinispan/infinispan/raw/master/README.mkdn; to do this, take the URL from your browser, and insert raw/master after the project name and before the path to the file.
If you want to indicate that the user needs to substitute a variable in a code sample with their own, then use < and > around the variable name. For example, to indicate the user needs to checkout a topic branch from git:
git checkout -b <topic>
Voice and grammar guide
By using a consistent voice throughout the documentation, the Infinispan documentation appears more professional. The aim is to make it feel to the user like the documentation was written by a single person. This can only be completely achieved by regular editing, however in order to make the workload of the editor lighter, following these rules will produce a pretty consistent voice.
-
Never use abbreviations. On the other hand, contractions are fine.
-
Always use the project name "Infinispan". Never abbreviate it.
-
Always write in the second or third person, never the first (plural or singular forms). Use the second person to emphasize you are giving instructions to the user.
Naturally, most people write in the first person, and, typically find it the easiest form to write, however without a lot of care it can produce the most "unprofessional" text. Conversely, writing in the third person is trickier, but will produce text that feels well written almost without fail. The first person can be used for emphasis but in general it is recommended to avoid it unless you feel confident!
Writing entirely in the third person can produce quite "dry" text, so it is recommended that you use the second person when you are giving instructions to the user. This could be when you are walking through a sequence of steps they should perform, or could be when you are stating that they must do something in order for them to succeed.
So, are there any tricks to reformulate a sentence so the first person is not used?
-
Use the passive voice "I recommend" can become "It is recommended". However, extensive use of the can produce boring, dry and indefinite text, so don't do this too much!
-
Change the subject. For example you can change "Here we discuss" to "This section discusses"
-
-
Use a "chatty" style. Although the use of the first person is avoided, the documentation shouldn't be too dry. Use the second person as needed. Short sentences and good use of punctuation help too!
-
If you define a list, keep the ordering of the list the same whenever you express the list. For example, if you say "In this section you will learn about interceptors, commands and factories" do not go on to say "First, let's discuss factories". This will subconsciously confuse the user
-
You should only capitalize proper nouns only. For example "data grid" is lower case (it's a concept), whilst "Infinispan" is capitalized (it's a project/product name)
-
You should always use American spelling. Enable a spell checker!
-
Use the definite article when discussing a specific instance or the indefinite article when describing a generalization of something; generally you omit the article when using a name for a project or product.
Infinispan uses a logging framework to communicate messages to the user, the logging framework used by Infinispan is JBoss Logging.
Let's dig into this. First, the sentence states that "Infinispan uses logging", and the indefinite article is used - we are not stating which of many possibilities is used. Second, the sentence goes on to discuss the logging framework Infinispan uses, and here the definite article is used, as the specific framework in use is discussed. Finally, the sentence is concluded by stating that the logging framework used is called "JBoss Logging", and as this is a product name, no article is used.
This is not a formal or complete description, but is a good rule of thumb.
-
Keep the tense the same. It's very easy to slip between the present, past and future tenses, but this produces text that is feels "unnatural" to the reader. Here's an example:
Data is collected from Infinispan every hour. Upon analysis the data showed that Infinispan is 2 million times faster than it's nearest competitor
You may not have noticed, but the phrase starts using the present tense (is) and slips into the past tense (showed). This is clearly not actually the order in which the events happened!
Of course, if you are actually describing the progression of time, then changing tenses is fine. For example:
In the last section you were shown how to configure Infinispan using XML, and in the next section you will be shown how to configure Infinispan programmatically.
-
If you are telling the user about a procedure they can follow, do be explicit about this, and enumerate the steps clearly
Glossary
When writing a glossary entry, you should follow the Basically Available, Soft-state, Eventually-consistent (BASE) as a template.
-
If the entry is commonly referred to using an acronym, then the title should consistent of the fully expanded name, with the acronym in brackets. You can then use the acronym always within the main text body
-
If you want to refer to other glossary articles using links in the text body, then just link them with no alternative text
-
If you want to make external links (e.g. wikipedia, user guide), then add a h2 header "More resources", and list them there. This clearly indicates to users when they are moving outside of our definitions
Screencasts
TODO